No products in the cart.
 03Nov
03Nov 

Did you know that 73% of DIY fashion enthusiasts say sewing their first garment completely transformed their relationship with clothing? If you’ve ever stood in front of your closet thinking, “I wish I could just make exactly what I want,” you’re definitely not alone. The question how do I sew a dress ranks among the top searched fashion DIY queries, with over 45,000 monthly searches from aspiring sewists worldwide.
I still remember my first attempt at dressmaking—armed with nothing but determination, a second-hand sewing machine, and a YouTube tutorial that made it look embarrassingly simple. Spoiler alert: my first dress looked like a fancy potato sack. But here’s the beautiful truth I discovered along the way: how do I sew a dress: 7 easy steps for beginners isn’t just a catchy title—it’s genuinely achievable, even if you’ve never threaded a needle before.
Whether you’re drawn to sustainable fashion, craving custom fits, or simply want to channel your inner creative spirit, this comprehensive guide will walk you through everything you need to know. From selecting the perfect fabric to adding those final finishing touches, I’m breaking down the dress-sewing process into manageable, confidence-building steps that will have you wearing your handmade creation sooner than you think.
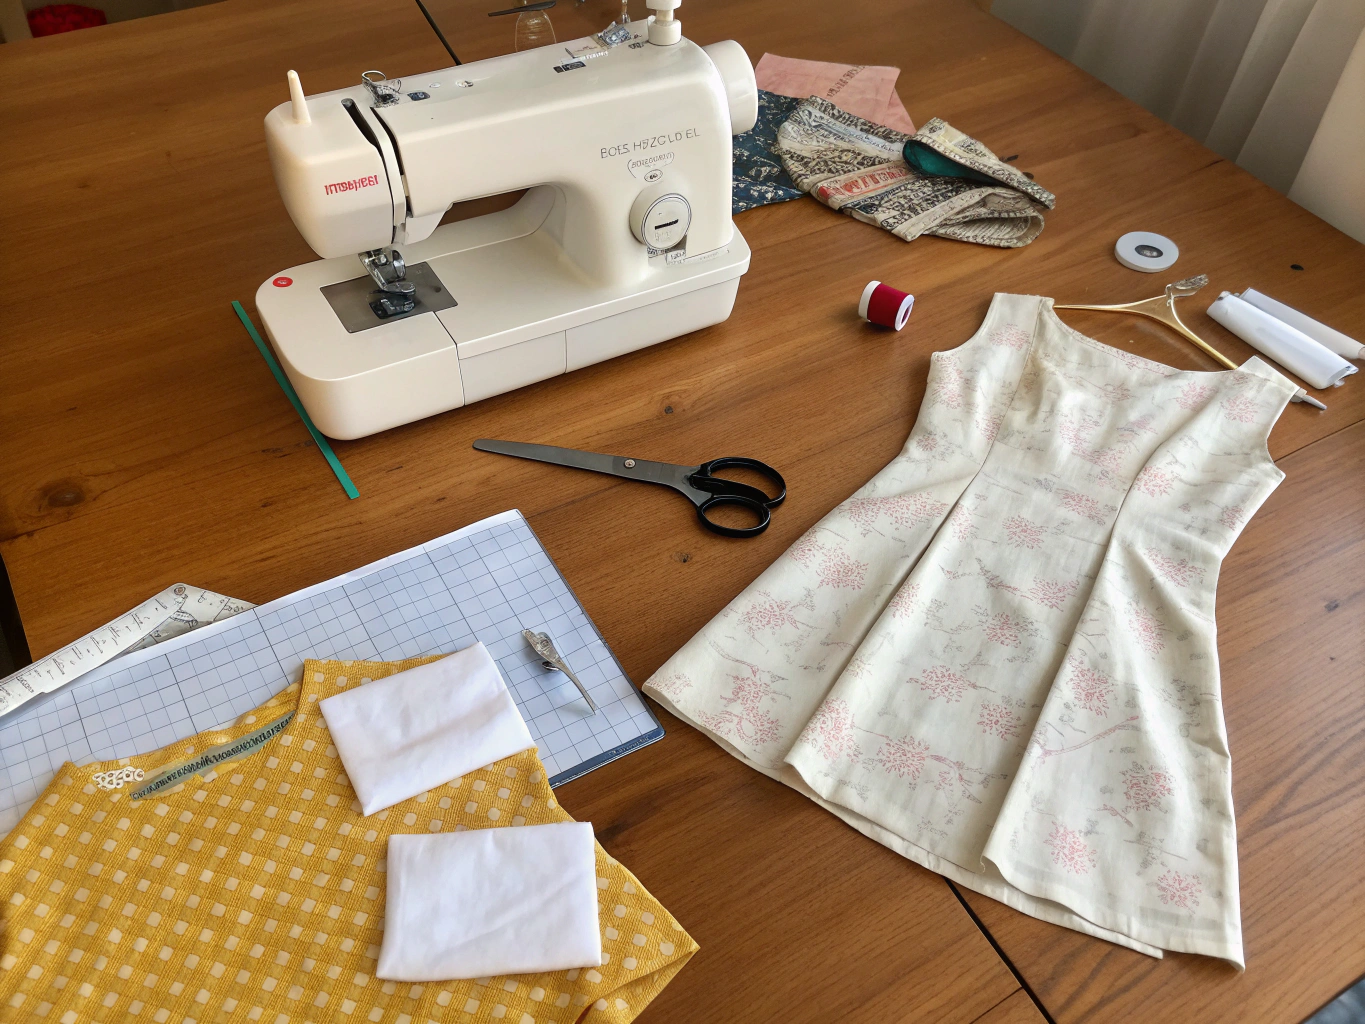
Before we dive into the actual sewing process, let’s talk about the essentials you’ll need to gather. Think of this as your dress-making toolkit—your creative arsenal that will turn fabric dreams into wearable reality.
Cotton Voile or Poplin – Perfect for beginners because it’s forgiving, doesn’t slip, and presses beautifully. The crisp texture feels refreshing against your skin, and the subtle sheen catches light in the most flattering way.
Linen Blend – If you want that effortlessly chic, slightly rumpled aesthetic, linen is your friend. It breathes like a dream and develops character over time.
Rayon Challis – For a more fluid, romantic drape. Fair warning: it’s slightly trickier to handle, but the movement is absolutely worth the extra attention.
Substitution tip: If cotton feels too basic, swap it for a cotton-silk blend for subtle luxury without the handling headaches.
Here’s where beginners often feel overwhelmed: “How long will this actually take?” Let me give you realistic expectations based on my years of experience teaching first-time sewists.
A simple shift dress takes approximately 4-6 hours for complete beginners, spread comfortably over a weekend. Compare this to the hours you might spend hunting through crowded stores for something that “almost” fits—only to compromise on color, length, or quality.
According to a 2023 survey by the Craft Yarn Council, 68% of beginners who completed their first sewing project reported feeling more confident in tackling future garments. The initial time investment pays compound interest in skills and satisfaction.
My personal experience: When I made my first wearable dress (attempt number three, if we’re being honest), it took me about 8 hours total. Now, I can create a similar style in under 3 hours. Your learning curve will accelerate faster than you expect.
Pro tip: Break your project into sessions. Day one: cutting and preparation. Day two: construction. Day three: finishing and fitting. This prevents fatigue and keeps the process enjoyable.
Now for the heart of this guide—the seven essential steps that answer the question every beginner asks: how do I sew a dress from start to stunning finish?
This step is crucial, and I can’t emphasize it enough. A complicated pattern will crush your enthusiasm faster than a broken needle.
Look for patterns labeled “beginner,” “easy,” or “learn to sew.” Independent pattern companies like Tilly and the Buttons, Seamwork, and Made by Rae offer excellent options with detailed instructions. The classic shift dress or A-line silhouette with minimal darts is ideal because it forgives minor measurement errors while still looking polished.
Stylist trick: Read pattern reviews before purchasing. Other sewists share invaluable insights about fit adjustments and potential challenges.
Grab your soft measuring tape and a friend if possible. You’ll need:
Here’s something pattern instructions rarely tell you: measure yourself in the undergarments you’ll wear with the finished dress. It genuinely makes a difference.
Compare your measurements to the pattern’s size chart, not your ready-to-wear size. Pattern sizing runs differently, and there’s no shame in cutting a size 12 when you normally wear an 8.
This step separates amateur projects from polished pieces. Most natural fabrics shrink between 3-5% on first wash. If you skip this step, your carefully constructed dress might fit perfectly until laundry day—then become unwearable.
Wash your fabric exactly how you’ll wash the finished garment. Press it while slightly damp for the smoothest surface. This is meditative, I promise—there’s something deeply satisfying about preparing your materials with intention.
Lay your fabric on a flat surface (your floor works perfectly), fold it selvage to selvage, and position your pattern pieces according to the layout guide. The grain line must run parallel to the selvage—this isn’t optional; it affects how your dress hangs.
Use sharp scissors and cut in long, smooth strokes. Transfer all markings (notches, darts, dots) to your fabric using tailor’s chalk or disappearing ink markers.
Beginner tip: Cut conservatively. You can always trim more fabric later, but you can’t add it back.
Now the magic happens! Start with the largest seams—typically shoulder seams and side seams for a simple dress.
Pin or clip your pieces right sides together, matching notches and edges. Use a 5/8″ seam allowance unless your pattern specifies otherwise. Sew slowly and steadily, backstitching at the beginning and end to secure your stitches.
After each seam, press it open or to one side as directed. I know pressing after every seam feels tedious, but this single habit will elevate your work from “homemade” to “handmade couture.”
Depending on your pattern, this might involve inserting a zipper, adding buttons, or simply finishing with elastic at the waist or neckline.
For beginners, I recommend starting with patterns featuring back zippers—they’re hidden and forgiving. Or better yet, choose a pattern with no closures, like a wrap dress or pull-over style.
Finish your neckline and armholes with bias tape, facing, or a simple fold-and-stitch hem. Take your time here; these details frame your face and show most prominently.
The final step! Measure your desired length, press up your hem allowance, and stitch it in place. A blind hem creates the most invisible finish, but a simple straight stitch works beautifully for casual styles.
Slip into your creation. Stand in front of a full-length mirror. Take a moment to appreciate what you’ve accomplished—you’ve literally made clothing with your own hands.
Understanding fabric and fit transforms a decent dress into a phenomenal one.
Cotton blends are approximately 40% more breathable than pure synthetics, according to textile research from the University of Leeds. This matters tremendously for all-day wear. I once made a summer dress from polyester crepe—never again. By noon, I felt like I was wearing a portable sauna.
Fit considerations for beginners:
Fabric weight affects drape: Lighter fabrics like voile create floaty, romantic movement, while medium-weight cotton creates structure. Choose based on the vibe you’re seeking.
One of the most rewarding aspects of learning how do I sew a dress is contributing to a more sustainable wardrobe.
Budget-friendly fabric sources:
Eco-conscious material choices:
Real talk: My favorite summer dress cost me $18 total—$12 for thrifted linen curtains and $6 for a pattern. It receives more compliments than anything in my store-bought wardrobe.
Your handmade dress deserves thoughtful styling for every season.
Spring: Layer with a cropped cardigan in complementary colors. Add white sneakers for weekend markets or strappy sandals for brunch.
Summer: Keep it minimal—statement earrings and comfortable slides. A woven belt defines your waist beautifully.
Autumn: Add opaque tights in burgundy or forest green, ankle boots with a comfortable heel, and a structured blazer.
Winter: Layer over a fitted turtleneck (game-changer!), add knee-high boots, and complete with a wool coat.
Personalized tip: If you’re petite like me, ankle boots with a pointed toe elongate your legs better than chunky styles. If you’re tall, embrace bold knee-high boots that would overwhelm smaller frames.
Learning from others’ mistakes accelerates your growth. Here’s what I wish someone had told me:
Mistake #1: Ignoring the grain line
Fix: Always align pattern arrows with the fabric selvage. Off-grain cutting causes twisting and poor drape.
Mistake #2: Skipping the muslin test
Fix: For fitted dresses, make a test version in inexpensive fabric first. Adjust fit before cutting your gorgeous material.
Mistake #3: Rushing the cutting process
Fix: Measure twice, cut once. This ancient wisdom exists for a reason.
Mistake #4: Neglecting to press
Fix: Press every seam before moving forward. According to professional sewists, proper pressing accounts for 60% of polished results.
Mistake #5: Using dull scissors
Fix: Sharpen or replace scissors that tear rather than cut cleanly. Frayed edges create messy seams.
Your handmade dress deserves proper maintenance.
Washing guidelines:
Storage wisdom:
Pro tip I learned the hard way: Never store anything with wooden buttons in plastic containers. Moisture builds up and warps them.
You now have everything you need to answer the question how do I sew a dress: 7 easy steps for beginners with confidence and creativity. From choosing forgiving fabrics and beginner-friendly patterns to mastering essential construction techniques and caring for your finished garment, this journey transforms you from curious observer to capable creator.
Remember, every professional seamstress started exactly where you are now—curious, slightly nervous, and excited about possibilities. Your first dress won’t be perfect, and that’s genuinely okay. Each stitch teaches you something, each mistake refines your skills, and each completed project builds unstoppable confidence.
Ready to begin? Gather your supplies this weekend, choose a simple pattern that speaks to your style, and take that first step. Share your progress photos using #MySewingJourney, explore our seasonal styling guides for more inspiration, and remember—the best dress you’ll ever own might just be the one you make yourself.
Expect 4-8 hours for a simple dress, spread over one or two days. As your skills develop, this time decreases significantly. Don’t rush—enjoy the process.
A-line or shift dresses with minimal shaping are most forgiving. Avoid princess seams, complicated sleeves, or extensive darting until you’ve built confidence.
Absolutely not! A basic machine with straight and zigzag stitches handles most dress construction. Many beginners create beautiful garments on vintage machines found at estate sales.
Start with medium-weight cotton or cotton blends. They’re stable, press well, and don’t slip during cutting. Save silks and slippery rayons for later projects.
Choose the larger size and adjust as needed. It’s easier to take in a garment than let it out. For significant differences between bust, waist, and hips, learn basic pattern grading.
Press every seam, finish raw edges (with zigzag stitches or French seams), take your time with details, and use quality thread that matches your fabric.


 03Nov
03Nov  03Nov
03Nov  03Nov
03Nov  04Nov
04Nov  20Jan
20Jan  20Jan
20Jan