
How to Preserve a Wedding Dress in 7 Easy Steps at Home: A Stylist’s Complete Guide
Introduction
Did you know that approximately 2.5 million weddings take place in the United States each year, yet nearly 60% of brides admit they’ve never properly preserved their wedding dress after the big day? That stunning gown—often costing anywhere from $1,000 to $5,000 or more—ends up stuffed in a closet, yellowing in a cardboard box, or worse, developing irreversible stains within just a few months.
As a fashion professional who has helped countless brides navigate their post-wedding wardrobe decisions, I can tell you that learning how to preserve a wedding dress in 7 easy steps at home isn’t just about saving fabric. It’s about protecting memories, honoring an investment, and potentially creating a family heirloom that could grace future generations.
I remember when my best friend called me in a panic, three weeks after her honeymoon. She’d discovered champagne stains on her silk organza train that she swore weren’t there before. The truth? They were invisible wet stains that oxidized over time—a devastatingly common occurrence that’s entirely preventable with proper preservation knowledge.
Whether you’re a recent bride, planning ahead, or helping a loved one protect their cherished gown, this comprehensive guide will walk you through professional-grade preservation techniques you can absolutely accomplish at home.
Wardrobe Essentials for Wedding Dress Preservation
Before we dive into the step-by-step process of preserving your wedding gown, let’s gather the essential supplies you’ll need. Think of this as your bridal preservation toolkit—every item serves a crucial purpose in protecting your dress’s delicate fabrics, intricate beadwork, and precious memories.
Primary Preservation Supplies:
- Acid-free tissue paper – This archival-quality paper prevents yellowing and chemical transfer. The soft, pH-neutral sheets feel like whispers against delicate lace and satin.
- Acid-free preservation box – Look for boxes specifically designed for wedding dress storage, featuring reinforced corners and breathable construction.
- Muslin garment bag – Swap synthetic bags for breathable cotton muslin. The natural fibers allow air circulation while keeping dust and pests at bay.
- White cotton gloves – Your hands contain oils that can permanently stain silk and satin. These soft gloves create a protective barrier during handling.
- Soft bristle brush – Perfect for gently removing surface debris from tulle and delicate overlays.
Alternative Options:
If budget constraints are a concern, consider swapping the professional preservation box for a clean, acid-free archival storage container from craft stores. While slightly less specialized, these alternatives can cost 40% less while still providing adequate protection.
For the muslin bag, you could repurpose a clean white cotton bedsheet—just ensure it’s been washed without fabric softener or scented detergent, which can transfer chemicals to your gown.
Cleaning Supplies:
- Gentle, pH-neutral fabric cleanser
- Distilled water (tap water contains minerals that can stain)
- Clean white towels
- Steamer (optional, for wrinkle removal)
The tactile experience of gathering these supplies feels almost ceremonial—a final act of care for the dress that witnessed your most special day.
Styling Time: How Long Does Wedding Dress Preservation Take?
Let’s talk real numbers here, because I know you’re wondering: “How much time am I actually committing to this project?”
Complete at-home wedding dress preservation typically takes 4-6 hours, spread across 2-3 sessions. Compare this to professional preservation services, which often hold your dress for 4-8 weeks and charge $200-$500 or more.
Here’s a realistic breakdown:
| Task | Time Required |
|---|---|
| Initial inspection & spot treatment | 45-60 minutes |
| Cleaning (if needed) | 1-2 hours |
| Drying time | 24-48 hours |
| Wrapping & boxing | 1-2 hours |
| Final quality check | 15-30 minutes |
When I preserved my cousin’s vintage-inspired A-line gown last spring, I broke the process into three manageable sessions: one Saturday afternoon for inspection and cleaning, a full day of supervised drying, and a peaceful Sunday morning for the wrapping ritual.
The time investment pays dividends. According to the Association of Wedding Gown Specialists, properly preserved dresses can maintain their original beauty for 50+ years, while improperly stored gowns may show deterioration within just 2-3 years.
Step-by-Step Styling Guide: How to Preserve a Wedding Dress in 7 Easy Steps at Home
Now for the heart of this guide—the actual preservation process. I’ve refined these steps over years of working with brides and studying textile preservation techniques. Each step builds upon the last, creating a comprehensive system for DIY wedding dress preservation that rivals professional results.
Step 1: Inspect Your Gown Thoroughly Within the First Week
Time is genuinely of the essence here. The moment your celebrations conclude, invisible threats begin attacking your dress. Perspiration, champagne, makeup, and even the natural oils from well-wishers’ hugs start oxidizing immediately.
Within 48-72 hours of your wedding, hang your gown in a well-lit area and examine every inch. Use your phone’s flashlight to spot hidden stains—they often appear as slight discolorations or areas where the fabric feels stiffer than surrounding material.
Stylist trick: Photograph any spots you find with a coin placed nearby for scale reference. This documentation helps track whether stains spread or respond to treatment.
Pay special attention to:
- The hemline (grass, dirt, makeup foundation from hugs at ground level)
- Underarm areas (perspiration)
- The bust and neckline (makeup transfer)
- The bustle points (handling during reception)
Step 2: Address Stains Before They Set Permanently
Here’s where many home preservationists make their first critical mistake: attacking stains aggressively with household cleaners. Please, resist this urge entirely.
Wedding gown fabrics—silk, satin, organza, tulle, and delicate lace—require gentleness that borders on reverent.
For water-soluble stains (wine, champagne, food):
- Mix one tablespoon of pH-neutral soap with one cup of distilled water
- Dip a clean white cloth into the solution
- Gently blot (never rub!) from the outside of the stain inward
- Press a dry white towel against the area to absorb moisture
For oil-based stains (makeup, lotions):
- Sprinkle a thin layer of cornstarch over the stain
- Wait 30 minutes to absorb the oils
- Gently brush away with a soft bristle brush
- Repeat if necessary
Pro tip: When treating beaded or embellished areas, work from the reverse side of the fabric whenever possible. This protects decorative elements while still addressing the stain.
Step 3: Clean or Professionally Dry Clean (Based on Fabric Type)
Understanding your dress’s fabric composition determines your cleaning approach. Check the care label—if it says “dry clean only,” please honor that recommendation, especially for heavily embellished or vintage gowns.
However, many modern wedding dresses made from polyester blends, certain silks, and cotton can tolerate gentle at-home cleaning:
For spot-cleanable fabrics:
Fill a clean bathtub with lukewarm distilled water and add a few drops of gentle detergent designed for delicates. Submerge the dress and gently swish—imagine you’re bathing something precious and irreplaceable (because you are).
Allow the dress to soak for 30-45 minutes, then drain and refill with fresh distilled water for rinsing. Repeat until no soap residue remains.
What I learned the hard way: Never wring, twist, or hang a wet wedding dress. The weight of water-logged fabric can permanently stretch seams and distort the silhouette. Instead, lay the gown flat on clean white towels and roll gently to absorb excess moisture.
Step 4: Dry Your Gown Properly to Prevent Mildew
Improper drying creates the perfect environment for mold and mildew—destroying more gowns than any other post-wedding mistake.
Lay your dress flat on a clean, elevated surface (a mesh drying rack works wonderfully) in a climate-controlled room. Avoid direct sunlight, which can yellow white fabrics and fade colored elements.
Air circulation is essential. Point a fan toward the dress on its lowest setting, ensuring airflow reaches all layers, especially within the skirt’s interior.
Drying typically takes 24-48 hours depending on humidity levels and fabric weight. The dress should feel completely dry to the touch—not “almost dry” or “probably fine.” Any residual moisture trapped in boxing will become mildew within weeks.
Stylist secret: If you’re drying during humid summer months, consider running a dehumidifier in the same room. This single addition can reduce drying time by 30% and dramatically decrease mold risk.
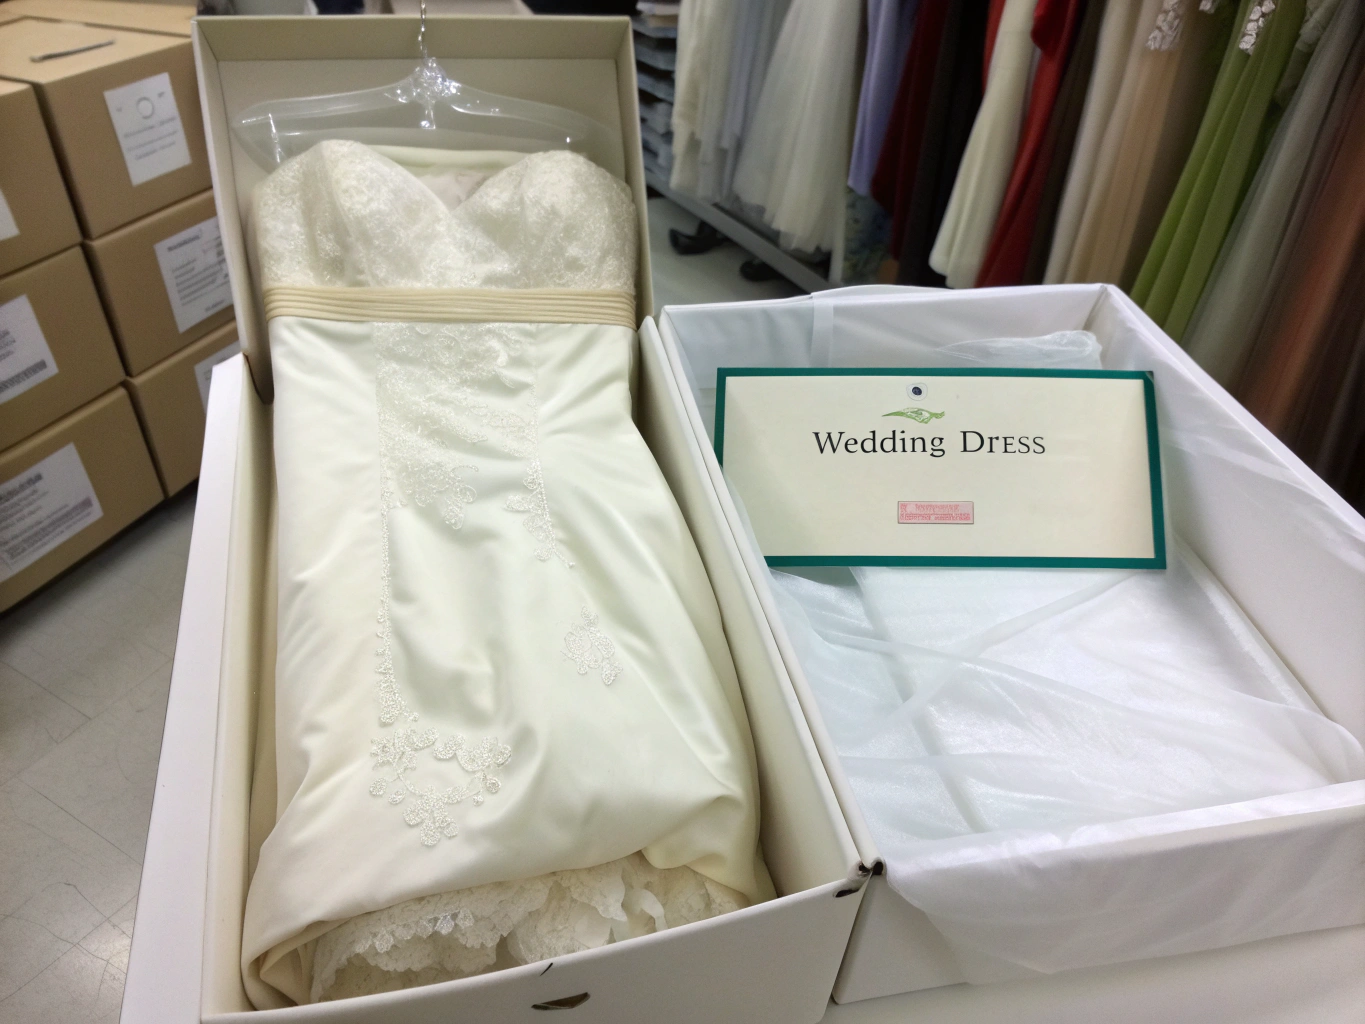
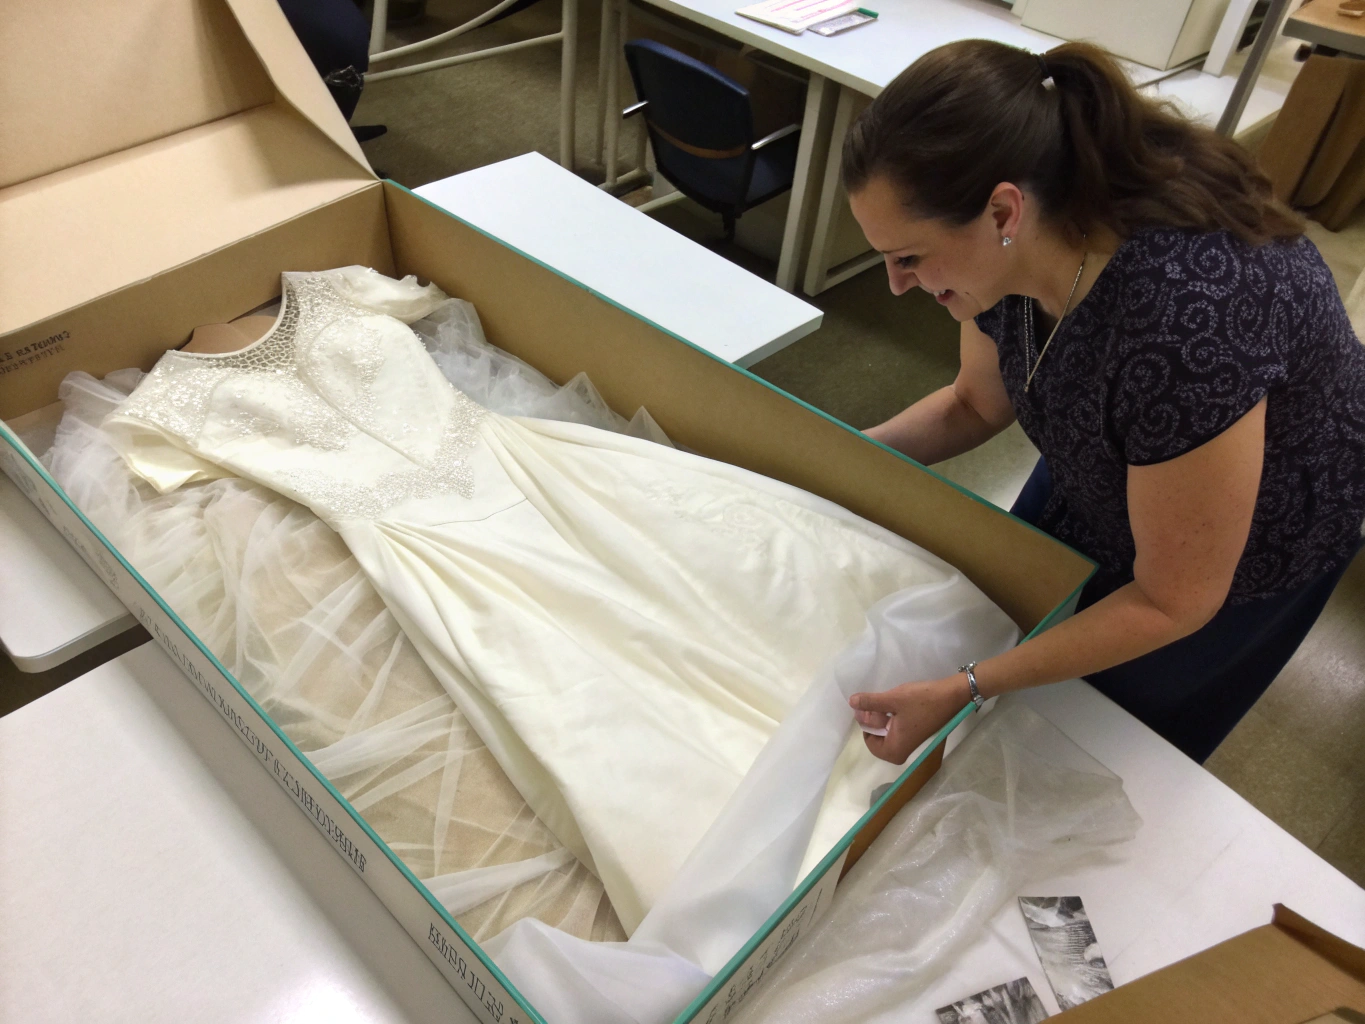
Step 5: Prepare Acid-Free Materials and Storage Environment
Once your gown is thoroughly dry, it’s time to prepare your preservation materials. This step requires patience and attention to detail—but the meditative quality of smoothing tissue paper and arranging your workspace feels like a fitting tribute to your dress.
Unbox your acid-free tissue paper and allow it to breathe for several hours. Even archival materials can absorb environmental odors during shipping.
Line your preservation box with multiple sheets of tissue, creating a cushioned bed for your gown. The tissue should extend beyond the box edges—you’ll fold these over the dress like a protective cocoon.
Step 6: Fold and Wrap Using Proper Preservation Techniques
This step separates amateur preservation from truly professional results. How you fold your dress matters enormously for preventing permanent creases, especially in structured fabrics like duchess satin.
The key principle: Prevent fabric-to-fabric contact and cushion every fold.
- Lay your gown face-down on a clean, flat surface
- Place acid-free tissue inside the bodice, creating a supportive “form”
- Gently fold the skirt in thirds lengthwise, placing tissue between each layer
- Roll (don’t fold!) the train, inserting tissue throughout
- Fold sleeves toward the back, cushioning with tissue at each bend point
- Place the entire dress into your lined preservation box
- Tuck rolled tissue paper into any remaining voids
- Fold excess tissue over the top
Warning: Never store your dress in plastic. Plastic traps moisture and gases that accelerate yellowing. Even the plastic zip bags from bridal shops are intended for short-term transport only.
Step 7: Store in Optimal Conditions and Schedule Annual Inspections
Your preserved gown needs a stable home—temperature and humidity fluctuations are silent destroyers of textile integrity.
Ideal storage conditions:
- Temperature: 65-75°F (constant)
- Humidity: 45-55%
- Location: Interior closet, away from exterior walls
- Positioning: Stored flat, never hanging long-term
Avoid attics, basements, and garages at all costs. These spaces experience extreme temperature swings and humidity variations that accelerate fabric degradation by up to 300% compared to climate-controlled interiors.
My annual ritual: Every year on my wedding anniversary, I open my preservation box, briefly inspect my gown for any changes, and refold it along slightly different lines. This prevents permanent creasing and gives me a moment to reconnect with those beautiful memories.
Fashion Fit & Comfort Insights: Understanding Wedding Dress Fabrics
Different fabrics demand different preservation considerations. Understanding your gown’s composition helps you make informed decisions throughout the process.
Silk (including dupioni, charmeuse, and organza):
Silk is protein-based and highly susceptible to yellowing when exposed to light or acidic conditions. Studies show silk degradation accelerates 40% faster in non-archival storage compared to acid-free environments.
Polyester and synthetic blends:
More stable than natural fibers, synthetics resist yellowing but can develop permanent wrinkles if stored improperly. The good news? They’re more forgiving of minor cleaning mistakes.
Lace (cotton or synthetic):
Vintage cotton lace requires extra tissue cushioning to prevent crushing. Modern synthetic lace is more resilient but still benefits from careful handling.
Tulle:
Surprisingly durable but prone to crushing. I’ve found that loosely rolling tulle sections (rather than folding) maintains their ethereal quality decades later.
When I examined my grandmother’s 1955 silk wedding dress, preserved using these same principles, the fabric still felt supple and the ivory color remained true—a testament to proper preservation’s long-term effectiveness.
Sustainable & Affordable Alternatives for Wedding Dress Preservation
Not everyone can invest in premium archival supplies, and that’s completely understandable. Here are budget-conscious alternatives that still protect your gown:
Budget-friendly acid-free tissue:
Craft stores like Blick Art Materials and Hobby Lobby offer archival tissue paper at 50-60% less than specialty bridal suppliers. Verify the packaging states “acid-free” and “lignin-free.”
DIY preservation box:
Purchase a large acid-free archival box from Container Store or Amazon ($15-30) instead of branded “wedding” preservation boxes ($75-150). Functionally identical, dramatically cheaper.
Eco-conscious options:
Several companies now offer preservation materials made from post-consumer recycled content. Brands like Gaylord Archival and Conservation Resources provide sustainable alternatives without sacrificing protection quality.
Community resources:
Local historical societies and museum conservation departments sometimes offer preservation workshops. I attended one at my city’s history museum and learned professional textile handling techniques absolutely free.
Outfit Pairing Suggestions: What to Preserve Alongside Your Dress
Your wedding dress didn’t exist in isolation—consider preserving complementary items that complete the memory:
Essential additions:
- Veil (fold separately with extra tissue cushioning)
- Hair accessories and jewelry (store in separate acid-free pouches)
- Wedding shoes (stuff with tissue to maintain shape)
- Gloves or wraps
Sentimental extras:
- A swatch from any altered fabric
- Your wedding invitation (archival sleeve recommended)
- A photograph of your complete look
Seasonal considerations:
If you married in winter, your faux fur stole or velvet wrap deserves preservation attention too. Summer brides might preserve delicate lace parasols or flower crowns (dried and carefully wrapped).
Common Style Mistakes to Avoid During Preservation
Even well-intentioned preservation attempts can go wrong. Here are pitfalls I’ve witnessed (and occasionally rescued):
Mistake #1: Waiting too long to begin
Every day you delay increases oxidation risk. The Textile Museum recommends starting preservation within two weeks maximum.
Mistake #2: Using scented products
Fragranced tissue paper, sachets, or cedar chips can permanently transfer odors to fabric. Always choose unscented, pH-neutral materials.
Mistake #3: Storing near exterior walls or windows
Temperature fluctuations near walls cause condensation that leads to mold. Always choose interior closet space.
Mistake #4: Hanging instead of boxing
Long-term hanging stretches shoulders and seams irreversibly. Hang temporarily; box permanently.
Mistake #5: Sealing boxes completely
Gowns need minimal air circulation. Leave preservation boxes slightly unsealed or use breathable archival boxes.
Clothing Care & Storage Tips: Long-Term Preservation Maintenance
Your preservation work isn’t quite “set and forget.” Here’s how to maintain your gown’s beauty across decades:
Annual inspection checklist:
- Check for yellowing or discoloration
- Examine for pest evidence (tiny holes, webbing)
- Verify tissue paper remains crisp (replace if brittle)
- Refold along different lines to prevent creasing
Climate considerations:
If you relocate, reassess your storage location. Moving from Arizona’s dry climate to Florida’s humidity requires adjustment—consider adding silica gel packets (not touching the fabric) to absorb excess moisture.
Pro tip from experience: Keep a small notebook with your preservation box documenting inspection dates and any observations. Future generations will thank you for this care record.
Conclusion
Learning how to preserve a wedding dress in 7 easy steps at home empowers you to protect one of life’s most meaningful garments without professional price tags or lengthy wait times. From immediate post-wedding inspection through proper long-term storage, each step builds toward decades of preserved memories.
Your wedding dress represents more than fabric and thread—it holds the energy of your celebration, the embrace of loved ones, and the promise of your commitment. Treating it with preservation care honors that significance.
Whether you’re preserving your own gown, helping a daughter or friend, or considering preservation for a vintage family dress, these techniques deliver professional results within your own home.
Ready to begin? Gather your supplies this weekend and give your dress the care it deserves. Share your preservation journey with us in the comments, or explore our guides on vintage clothing care and bridal accessory storage for additional insights.
FAQs
How long does a preserved wedding dress actually last?
With proper preservation using acid-free materials and climate-controlled storage, a wedding dress can maintain its beauty for 50-100+ years. Museum-quality preservation techniques have successfully protected gowns from the 1800s.
Can I preserve a dress that’s already yellowed?
Yes, though results vary. Professional textile restoration can sometimes reverse yellowing, but home methods have limitations. Prevention is always easier than restoration—which is why immediate preservation matters so much.
Is professional preservation worth the cost?
For extremely delicate gowns, heavy embellishment, or vintage pieces, professional preservation offers expertise and guarantees that home methods cannot. However, for most modern gowns, at-home preservation following these steps achieves comparable results at 70-80% savings.
What if I find stains months after my wedding?
Address them immediately, even if set. Gentle spot treatment may lighten or remove older stains. For valuable gowns with stubborn stains, consult a textile conservation specialist before attempting aggressive treatment.
Can I store my dress in a vacuum-sealed bag?
Absolutely not. Vacuum sealing removes air circulation, traps moisture, and crushes delicate details. This common misconception has destroyed countless beautiful gowns.
How often should I check my preserved dress?
Annual inspections are sufficient for well-preserved gowns in stable environments. If you live in a humid climate or older home, consider checking every six months initially.


Add comment