No products in the cart.
 03Nov
03Nov 

Did you know that over 2.5 million weddings take place in the United States each year, and the average bride spends approximately 6.5 hours researching dress designs before her first boutique appointment? Whether you’re an aspiring fashion illustrator, a bride dreaming of a custom gown, or simply someone who loves sketching beautiful garments, learning how to draw a wedding dress in 7 easy steps for beginners opens up a world of creative possibilities.
I still remember the first wedding dress I ever attempted to draw. It was a disaster—lopsided bodice, a skirt that looked more like a lumpy cloud than elegant tulle, and sleeves that belonged in a completely different century. Fast forward ten years, and I’ve illustrated hundreds of bridal gowns for designers, brides, and fashion magazines. The secret? A systematic approach that breaks down this seemingly complex garment into manageable, beautiful pieces.
Wedding dress illustration isn’t just about artistic talent—it’s about understanding structure, fabric flow, and the emotional essence that makes bridal wear so captivating. Whether you’re sketching for personal fulfillment, building a fashion portfolio, or designing your dream gown, this comprehensive guide will transform your blank page into a stunning bridal illustration. Grab your pencils, and let’s create something magical together.
Before we dive into the creative process, let’s assemble your essential toolkit. Think of these supplies as your “wardrobe essentials” for fashion illustration—each item serves a specific purpose in bringing your wedding dress vision to life.
Quality Sketching Pencils (HB, 2B, 4B): These are your foundation pieces—like a crisp white shirt in your closet. The varying softness allows you to create delicate lines for lace details and bolder strokes for dramatic silhouettes.
Smooth Bristol Paper or Mixed Media Paper: This is your canvas. Opt for at least 90 lb weight—it handles erasing beautifully and accepts various media without buckling. The smooth surface mimics the luxurious feel of satin under your fingertips.
Kneaded Eraser: Unlike harsh rubber erasers, kneaded erasers lift graphite gently, preserving your paper’s integrity. It’s the equivalent of swapping a stiff blazer for a soft, cropped leather jacket—achieving the same purpose with more finesse.
Fine-Line Markers (0.1mm and 0.3mm): Perfect for adding intricate details like beading, embroidery, and delicate lace patterns. These tools bring the crystalline shimmer and tactile elegance that wedding dresses demand.
Blending Stumps or Tortillons: These create soft shadows that give your gown depth and dimension—essential for capturing the dreamy, cloud-like quality of tulle and organza.
Reference Images: Collect 5-10 wedding dress images that inspire you. Pinterest boards, bridal magazines, and runway photos provide invaluable visual vocabulary.
Optional Upgrades: Colored pencils or watercolors for final rendering, a lightbox for tracing, and fashion figure templates if you’re still building confidence with proportions.
Let’s talk realistic expectations—because nothing kills creative momentum faster than unrealistic timelines.
For complete beginners, expect your first wedding dress sketch to take approximately 45-60 minutes. This might feel slow compared to quick outfit sketches, but wedding gowns are inherently more complex than everyday fashion pieces. According to a 2023 survey by the Fashion Illustration Academy, beginners who followed structured step-by-step approaches completed their drawings 35% faster than those who attempted freehand sketching without guidance.
Here’s my personal comparison: When I first started, a single wedding dress illustration consumed my entire Saturday afternoon—easily 3-4 hours of frustrated erasing and restarting. Now? I can complete a detailed bridal sketch in 25-35 minutes, and you’ll get there too with consistent practice.
Time-Saving Insight: Using a basic fashion croquis (figure template) saves approximately 15-20 minutes per illustration. Instead of struggling with body proportions, you can focus entirely on the dress design—similar to how a capsule wardrobe eliminates morning decision fatigue.
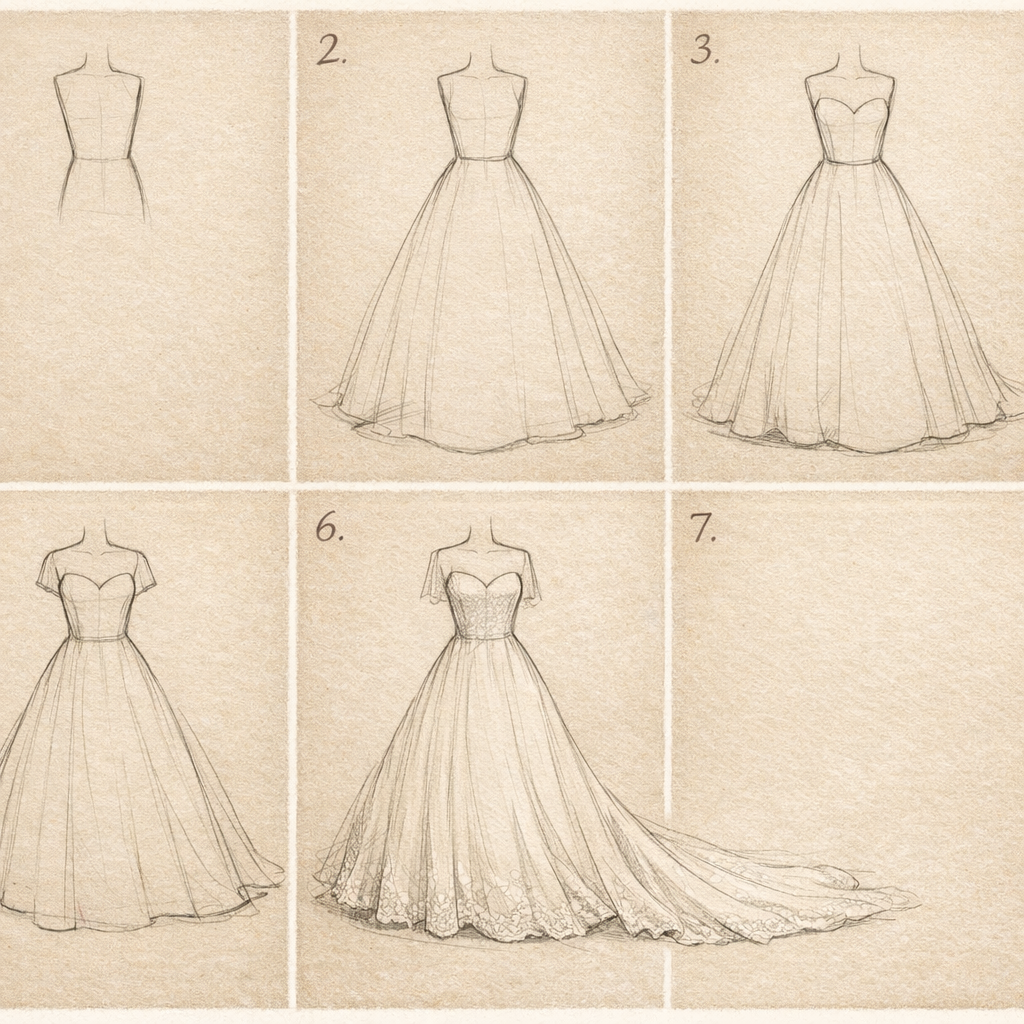
Every stunning wedding dress needs a body to drape upon. Start with a simple fashion croquis—a stylized figure that’s slightly elongated compared to real human proportions. Fashion figures typically measure 9-10 heads tall (versus the realistic 7.5 heads), creating that elegant, editorial silhouette.
Stylist Trick: Lightly sketch your figure using an HB pencil. Keep lines feathery and loose—you’ll erase most of them later. Focus on capturing the pose: Is your bride standing straight with hands clasped? Walking gracefully? The pose influences how fabric falls dramatically.
Draw a subtle center line down the torso—this invisible guideline ensures your bodice remains symmetrical. Mark the natural waistline (typically at the narrowest point) and hip placement. These reference points become crucial when positioning your dress silhouette.
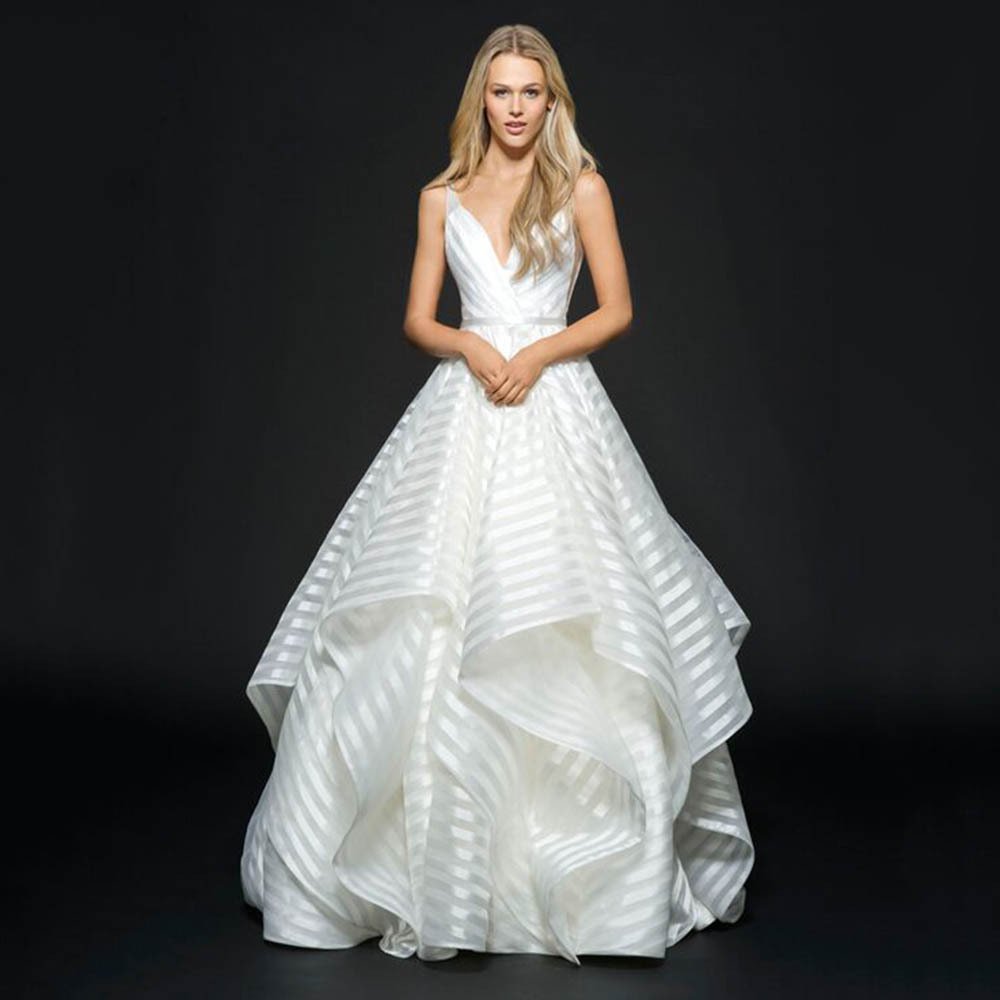
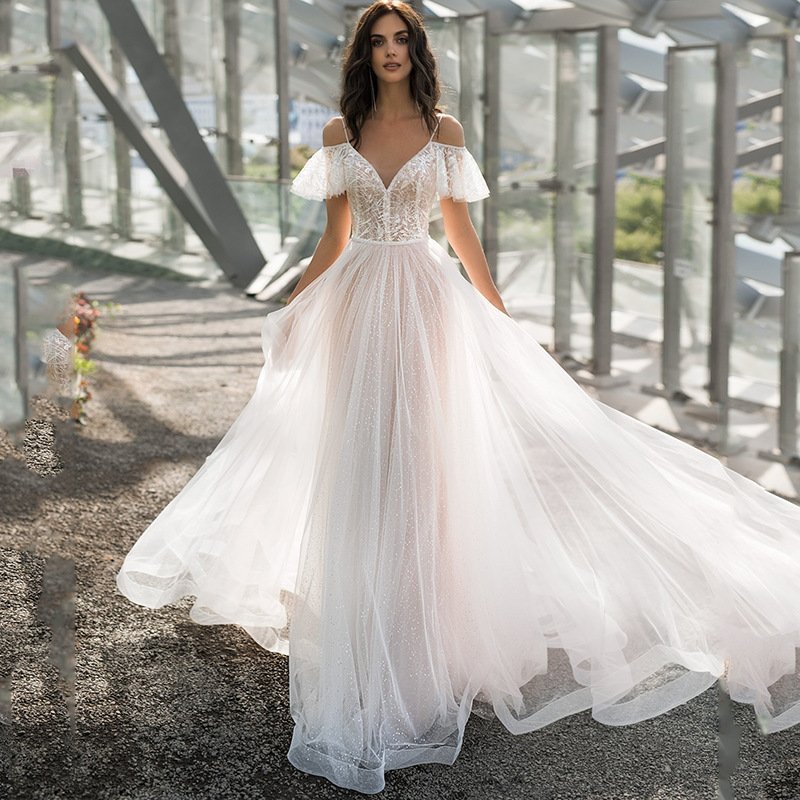
Wedding dresses fall into distinct silhouette categories, each with unique characteristics:
Using light pencil strokes, outline your chosen silhouette. Don’t worry about details yet—capture the overall shape. For beginners, I recommend starting with an A-line silhouette. It’s forgiving, elegant, and teaches fundamental principles without overwhelming complexity.
Stylist Trick: Imagine the dress as a soft, flowing garment rather than stiff armor. Wedding dresses move, breathe, and cascade. Let your lines reflect that organic quality by avoiding perfectly straight edges.
The bodice is where your dress gains personality. Popular neckline options include:
Draw your chosen neckline with slightly darker lines than your initial sketch. Add the bodice structure, paying attention to how fabric would naturally gather or fit against the body. Most bodices have internal boning or structure that creates smooth, flattering lines.
Stylist Trick: If you’re drawing a fitted bodice, imagine wrapping a piece of fabric tightly around a mannequin. Notice where slight wrinkles appear at the waist and how the fabric curves around the bust—these subtle details add realism.
This step transforms your sketch from flat outline to dimensional garment. Wedding skirts aren’t static—they capture movement, light, and air.
For full skirts, draw soft, curved lines radiating from the waist. These aren’t ruler-straight; they undulate gently like fabric caught in a breeze. Add subtle folds where fabric naturally gathers—at the waist attachment, where layers overlap, and along the hem where material pools on the ground.
Stylist Trick: Study how fabric behaves in photographs. Heavy satin creates smooth, sweeping curves with minimal folds. Lightweight tulle generates cloudlike volume with many soft, layered edges. Lace drapes differently than chiffon. Let your lines reflect the fabric you’re imagining.
For fitted skirts (like mermaid styles), draw lines that follow the body’s contours closely until the flare point, then allow fabric to dramatically cascade outward.
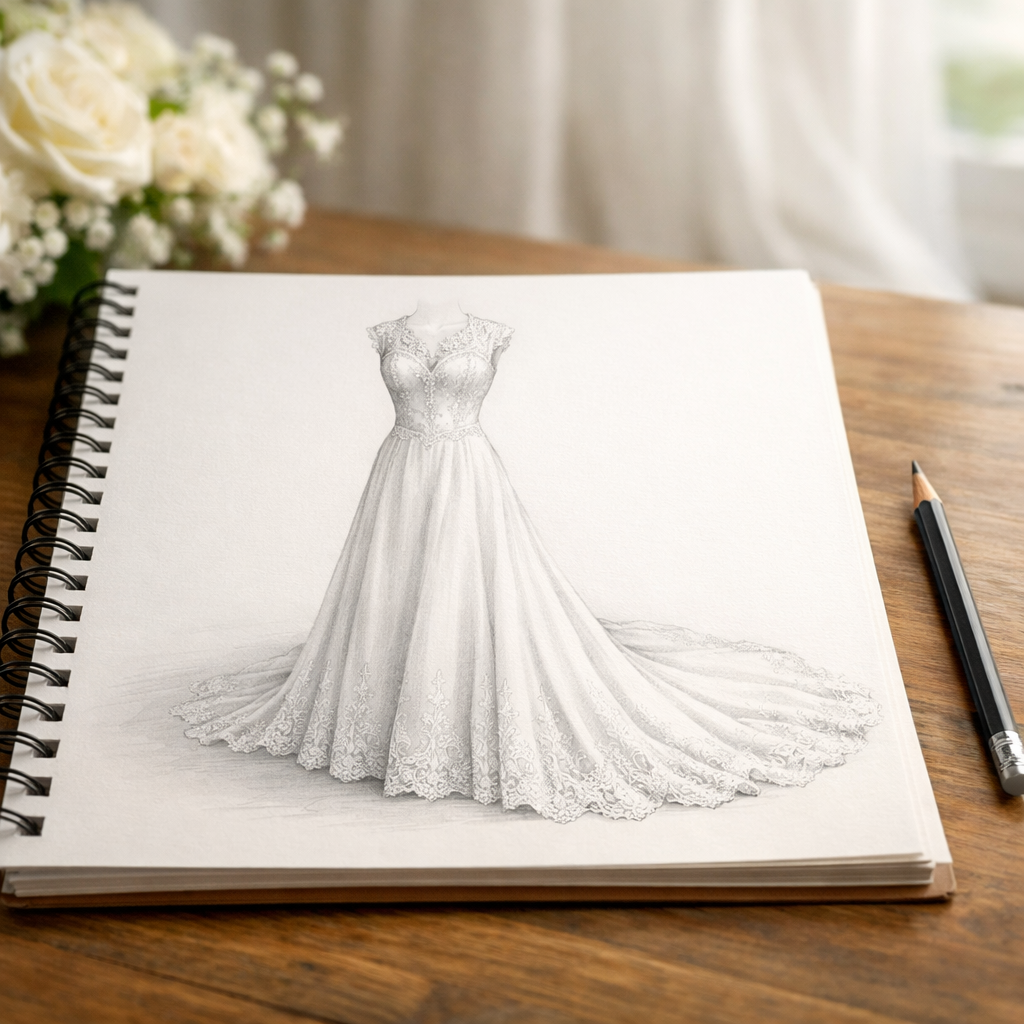
Now for the magic—those details that make wedding dresses breathtaking. Consider adding:
Waist Details: Sashes, belts, beaded bands, or delicate bow accents
Texture Elements: Lace overlay panels, embroidered bodices, or scattered appliqués
Back Interest: Buttons cascading down the spine, dramatic low backs, or illusion panels with floral lace
Train Styles: Sweep (minimal), court (modest elegance), chapel (traditional), cathedral (dramatic impact)
Using your fine-line markers or sharp pencils, carefully add these elements. For lace patterns, start with the overall shape, then suggest intricate details without drawing every single flower—your viewer’s imagination completes the picture.
Stylist Trick: Less is often more. Concentrate embellishments in specific areas (bodice, neckline edge, hem) rather than scattering them everywhere. This creates visual hierarchy and mimics real dress design principles.
Flat drawings lack the romantic, dreamy quality that makes wedding dress illustrations captivating. Strategic shading transforms your sketch.
Determine your light source direction (typically upper left or upper right). Add shadows on the opposite side of every fold, curve, and dimensional element. Use your blending stump to soften harsh shadow edges—wedding dresses are inherently soft, so your shading should be too.
Key shadow areas include:
Stylist Trick: Leave pure white highlights on the areas that would catch the most light—the top of bodice curves, the highest points of skirt folds, and embellishment peaks. This contrast creates the luminous, expensive quality that bridal gowns possess.
Step back from your drawing (literally—distance reveals flaws). Evaluate symmetry, proportion, and overall balance. Use your kneaded eraser to lift any distracting construction lines while preserving your final artwork.
Add finishing details:
Sign your work—you’ve created something beautiful!
Understanding fabric properties elevates your illustrations from good to exceptional. Each material behaves distinctively:
Silk Satin: Heavy, luxurious drape with smooth, reflective surface. Creates long, elegant folds with minimal texture. Studies show silk satin maintains 60% less wrinkling than synthetic alternatives.
Tulle: Lightweight, airy mesh creating voluminous layers. Generates soft, cloudlike edges and requires many subtle lines to convey its ethereal quality.
Lace: Delicate, textured patterns requiring detailed illustration. Chantilly lace flows softly; Guipure lace holds structure. I once spent an entire afternoon illustrating just the lace bodice of a Monique Lhuillier-inspired gown—the texture complexity demands patience.
Organza: Crisp, slightly stiff fabric with subtle sheen. Holds architectural shapes beautifully but shows sharp fold lines.
Crepe: Matte, flowing fabric with gentle movement. Creates softer, less dramatic folds than satin.
Fashion illustration doesn’t require expensive supplies to achieve beautiful results. Here are budget-friendly and eco-conscious swaps:
Instead of Bristol Paper: Try recycled sketchbook paper from brands like Canson Recycled. It performs nearly identically at half the price while reducing environmental impact.
Instead of Professional Pencils: Student-grade graphite sets from Staedtler or General’s Pencil Company deliver excellent results for beginners at 40% lower cost.
Instead of Blending Stumps: Tightly rolled tissue paper or cotton swabs work remarkably well—I still use this trick when traveling.
Instead of Fashion Templates: Free downloadable croquis from design blogs and educational sites provide professional-quality foundations without investment.
Elevate your wedding dress illustrations by adding complementary elements:
Veils: Cathedral-length for traditional gowns, birdcage styles for vintage silhouettes, or flower crowns for bohemian designs.
Jewelry: Delicate pearl earrings, statement necklaces (for simple necklines), or heirloom brooches.
Bouquets: Cascading florals for formal gowns, simple hand-tied arrangements for minimalist designs.
Shoes: Though often hidden, suggesting delicate heel straps beneath hem edges adds sophisticated detail.
Personalization Tip: If you’re petite (or drawing a petite figure), shorter veils and smaller bouquets maintain proportion without overwhelming the dress design.
Mistake #1: Ignoring Body Proportions
Even stylized figures need anatomical logic. Shoulders should align with hip width; waists shouldn’t shrink unrealistically.
Mistake #2: Static, Stiff Fabric
Wedding dresses flow and move. Avoid ruler-straight lines and perfectly symmetrical folds—imperfection creates realism.
Mistake #3: Over-Detailing Everything
Studies show viewers perceive illustrations as more sophisticated when details concentrate in focal areas rather than scattering uniformly.
Mistake #4: Neglecting Shadows
Flat drawings lack professionalism. Even subtle shading dramatically improves perceived quality.
Mistake #5: Rushing the Foundation
Weak figure sketches create weak dress illustrations. Invest time in your underlying structure.

Your finished illustrations deserve preservation:
Storage: Keep drawings flat in acid-free portfolios or archival sleeves. Rolling damages delicate pencil work.
Fixative Spray: Light coats of workable fixative prevent smudging without yellowing.
Digital Backup: Photograph or scan finished pieces—digital copies protect against physical damage.
Pro Tip: I learned this hard way—store artwork away from direct sunlight. UV exposure fades pencil work within months.
Learning how to draw a wedding dress in 7 easy steps for beginners transforms an intimidating creative challenge into an achievable, rewarding skill. By understanding silhouette foundations, mastering fabric behavior, and developing strategic shading techniques, you’ve gained tools that professional fashion illustrators use daily.
Remember, every accomplished artist started exactly where you are now—staring at blank paper, pencil in hand, wondering if their vision could possibly translate onto the page. It can. It will. With each sketch, your confidence grows, your lines become more assured, and your artistic voice emerges.
Try this seven-step approach today, share your creations with us, and explore our other fashion illustration guides for continued inspiration. Your bridal masterpiece awaits!
Most beginners see significant improvement within 10-15 dedicated practice sessions. Consistency matters more than duration—even 20-minute daily sketching sessions build skill faster than occasional marathon sessions.
Absolutely not. While training helps, countless successful fashion illustrators are self-taught. Structured guides, online tutorials, and persistent practice can achieve professional-level results.
A-line silhouettes offer the most forgiving starting point. Their simple shape teaches fundamental concepts without requiring complex fitted construction knowledge.
Tracing serves legitimate educational purposes when learning proportions and silhouettes. Many professionals use reference tracing during developmental stages—just don’t present traced work as original creations.
Suggest lace through strategic detail—draw complete lace motifs in focal areas while using lighter, implied marks elsewhere. Viewers’ brains complete the pattern naturally.

 03Nov
03Nov  03Nov
03Nov  03Nov
03Nov  04Nov
04Nov  20Jan
20Jan  20Jan
20Jan